Technology for Life, Kauppakatu 12 A 1, FIN-40100 Jyvaskyla, Finland
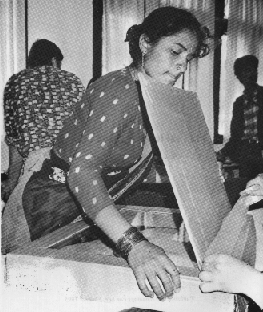
This manual is mainly for those who want to promote the use of solar cookers by teaching and training others in their home countries. It is not meant to be comprehensive, but more as an introduction to the wide variety of different ways in which solar energy may be used for cooking. It introduces a number of solar box cooker models. Some of them are older models, which we have had a lot of experience with. The newer models are interesting, but still have to be developed and tested carefully.
Technology For Life (TFL) is a Finnish non-governmental organisation founded 1983 for people interested in the responsible use of technology. It brings people together - from students to professionals - to discuss, promote and learn about more humane and environmentally friendly technology. TFL works to have ethical principles more often considered in decision-making. TFL works together with INES (International Network of Engineers and Scientists for Global Responsibility) for reducing arms and for liberating the resources to satisfy the basic needs of developing countries and for improving the state of the environment all over the world.
TFL began its project on solar box cookers in 1992 by delivering its first solar box cooker to Oshakati, Namibia. Later the project has been expanded to Nepal. Both Namibia and Nepal are very appropriate countries for solar cookers. For example, in Nepal the rate at which the forests are being depleted is the fourth highest in the world. Widespread use of solar cookers could significantly help to preserve forests, and thus decrease erosion.
Experience in Namibia and Nepal has shown that it is vital to involve local people in the promotion of solar box cookers right from the start of the project. The promoters must learn, and take account of, local conditions and local customs when planning their campaign. If cookers are just brought in from the outside by foreigners and left there together with printed manuals, this does not lead anywhere. It is necessary to stay with the people, become familiar with their customs and habits, and take their opinions and experiences into account when adapting the solar cooker to suit local conditions.
TFL wants to thank Finnish International Development Agency (FINNIDA) for publishing this manual. FINNIDA's financial aid has made it possible to continue with and broaden both research and fieldwork on solar cookers in Namibia and Nepal.
UNICEF has made an evaluation of solar cookers. They estimate that one third of global fuelwood use (350 million tons per year) could be preserved with solar cookers. Pay-back time is estimated to be less than 1 year. Although solar cooking would be economically viable, the poorest people and areas need supportive actions for purchasing them. The industrialised world must take responsibility of the development, and here NGOs, like TFL, have an important role.
Time for solar cookers has come.

The most advantageous areas for solar cooking are often the same with the biggest shortage of firewood!
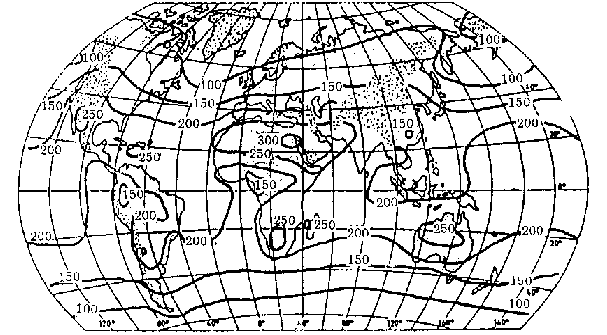
Unit: Watts/square-meter (w/m2)
Solar radiation passes through the window, and is absorbed by the walls, the bottom of the cooker and the cooking utensils (pots, pans, etc.). The darker the pots and the inside of the cooker are, the better they are heated. The window is not transparent to heat radiation, which means that the heat radiation coming from the walls and the pots will be trapped inside the cooker, thus heating the air.
To maximise the heating effect, the cooker's walls, and the outer side (not the inner side!) of the cooking pots should be painted black. The bottom should be covered with a black metal plate to carry heat to the pots. A double window is better than a single window because it reduces heat conduction. To increase the incoming solar radiation, reflective plates can be used; and in less-than-optional solar condition, their use is essential. They should be positioned so as to reflect radiation from a wider area into the box. In addition, the box should be mad as airtight as possible, so as to minimise the flow of hot air to the outside.
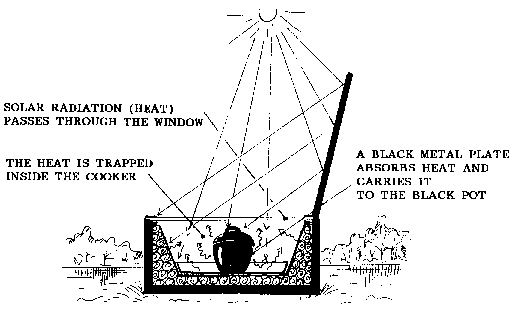
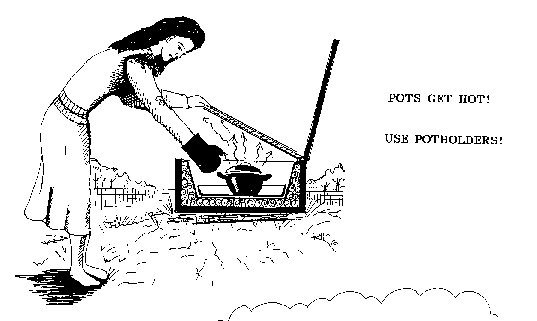
When you use your solar box cooker for the first time, pay attention to the cooking times of different meals. With practice you can learn to estimate the time necessary for cooking, and the food will be tasty without your continuous supervision . When you lift up the glass, watch out for the burning hot steam that may rise from the box. Because pots get hot in the solar box cooker, you should use pot-holders when lifting them out.
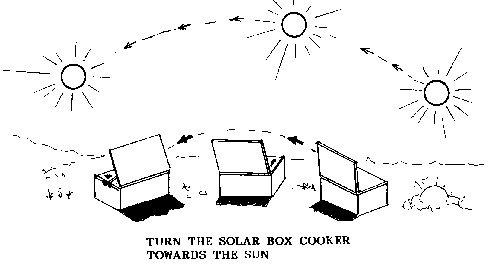
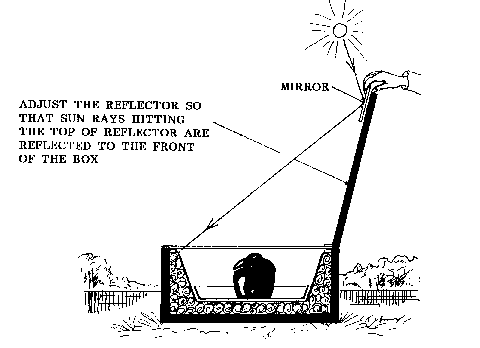
It is best to use solar box cookers when the sun is shining from a cloudless sky and when the outside temperature is over 20 C (70 F). The cooker should be placed facing directly towards the sun, so that no shadows fall inside the box. In this way the cooker will get the maximum amount of sunshine, and cooks fastest. Adjust the cooker's lid to reflect all the sunshine you can inside the box.
The cooker's position has to be changed so as to follow the sun's movement. If you are not in a hurry and there is a lot of sunshine, you can pre-set the cooker in the morning to the position where the sun shines at midday. Then it needs no further adjustments. Otherwise, if you are in hurry, you should change the cooker's position every 1-2 hours so that it always faces the sun.
The cooker's reflecting lid should be adjusted downwards or upwards according to how high (the vertical angle) the sun is shining. Remember not to use too much force in closing the lid, otherwise you might break the glass.
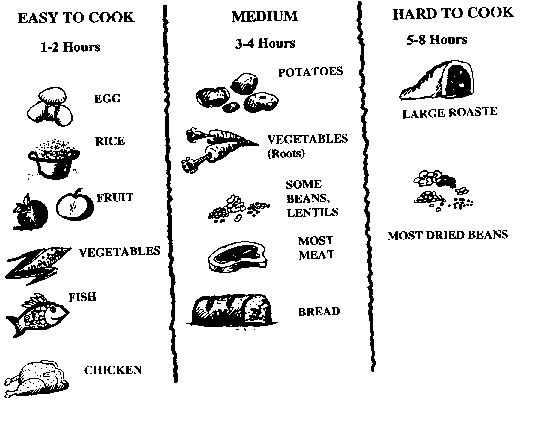
Cooking times can be roughly divided into three categories. Easy-to-cook foods take from half an hour to two hours; these include fish, chicken, eggs, vegetables, fruits, rice and pasta. Medium-cooking foods take from three to four hours; these include potatoes, roots, most meats (especially small pieces), seeds, lentils, bread and pastries. Slow-cooking foods take from five to eight hours; these include big amounts of food; large roasts; soup and stew; casserole; and most dried beans. Heating water also takes a long time, especially if you want to heat large amounts.
Stirring and mixing the food during cooking decreases the cooker's temperature and therefore slows down cooking. It is advisable to put the food in pots so that you do not need to stir it. However, if you must stir, do it quickly, only a few times and not before the food is already hot. Make sure to close the lids of the pots and the cooker's glass carefully after opening the cooker while cooking. If possible, use tightly-closing pots, because otherwise steam from the food covers the inside the glass, and this slows down cooking.
The temperature inside the cooker rises quickly to 100° C (210 F), which is high enough for cooking most foods. If you are baking bread, the temperature must be higher (140° C, 280 F); similarly, if you want to get a brown baking surface on the food. The temperature stays high (over 65° C, 150 F) from two to four hours (if you put a blanket on top of the lid, 1-2 hours without the blanket) after closing the cooker's lid, depending on the outside temperature. It is not advisable to store or eat dishes below 65 °C, because after this point the reproduction of microbes is high and the risk of food poisoning increases. Food is safe inside the cooker from rubbish, insects and animals, but do not store it there overnight because of the microbe risk.
It is easy to sterilise water in the solar box cooker, if you have clean pots with tight lids. After water has boiled for ten minutes, it is sterilised for drinking. Boiled water stays usable in a clean, closed pot or in an unopened, tightly-closed cooker.
Materials for pots must resist, conduct and retain heat well. Cast iron, pottery, aluminium (especially tefloned) and enamelled steel are suitable materials. The thicker the material is, the longer it takes to heat. However, thick material also stays warmer longer than thin material.
Keep your pots clean both outside and inside. If you have painted pots, and the surface has worn away, it is easy to repaint them. Small handles and knobs make the handling of the pots easy, but long handles take a lot of space inside the cooker.
Put water into the solar box cooker. Wait until it boils. Add flour and mix well. Boil the porridge for one or two hours while stirring.
Make loose porridge. Add one egg and mix well. Add the other ingredients and mix well. Serve porridge when it is still hot.
In the bottom of the roaster pan, place 1/3 of chopped cabbage and a little salt. Mix together ground meat, rice, chopped onion and spices. Spread this mixture over the cabbage. Then cover the mixture with 1/3 of chopped cabbage and salt. Spread the rest of the mixture over the cabbage and top with remaining cabbage. Pour over water in casserole. Cover and bake for 3 hours in solar box cooker.
Put meatcubes, chopped onions, chopped tomatoes and all other ingredients in casserole. Cover the casserole and bake in solar box cooker 1 to 2 hours.
Peel potatoes, carrots and onion. Cut potatoes into halves, carrots into small cubes and chop onion. Mix all ingredients slightly in casserole and cook in the solar box for about 2 hours.
First boil macaroni in water (1 litre) in the solar box for about half an hour. Pour off water and put ground meat, chopped onion, spices, mixed milk and eggs into the pot and bake casserole for about 3 hours in the solar box. The casserole will be ready when it has acquired a firm texture.
Soak beans overnight. Pour the water off and rinse beans with clean water. Put all ingredients into a pot and cook beans until their size has doubled.
Boil chopped onions in margarine. Add mashed tomatoes, purée and salt, and simmer in the solar box for about half an hour. Add herbs and cooked beans. Let the mixture boil and serve with grilled meat or sausages.
Put all ingredients in a pot. Pour water in until two-thirds of the meatcubes are covered. Let the stew boil slowly in the solar box for about 4 to 5 hours. When this meal is ready, the meat will have become very smooth and tasty.
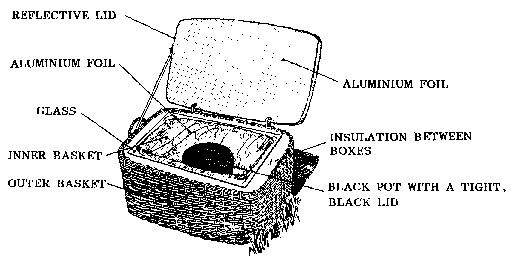
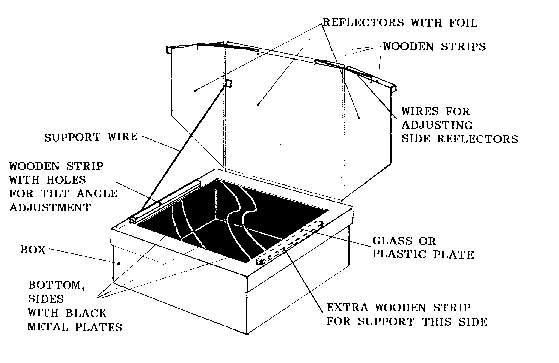
1. You should have two boxes, the smaller one inside the bigger one. They can be rectangular or round or something between. The material can be reed, cardboard, plywood, etc., depending on your means and the materials available. It is better to make boxes low and wide rather than high and narrow. The optimum height for the inner box is a few centimetres higher than your pots with their lids. There must be enough space for a sheet of glass at the top of the inner box. The top of the box must be flat enough for a sheet of glass to rest on it; and flat enough to provide an airtight seal.
2. There should be at least 5 cm thickness of insulation material in between the boxes. This prevents heat from escaping from inside the cooker. The filling material can be dry leaves, paper rolls, hay, straw, etc. Whatever material you use, make sure it is dry and do not fill too tightly. The reason for putting in this material is to prevent the air between the boxes from moving, as still air is a very good insulator in itself. You should add extra layers of aluminium foil between boxes to improve insulation. Usually one layer glued to the inside of the outer box is enough.
Note! Make sure that the bottoms of the boxes are well separated and insulated, as heat easily escapes there.
3. Use aluminium foil to cover the inside of the the inner box after connecting the boxes together.
Note! Cover the whole inside very carefully with the foil. Make sure there are no holes in the foiling, which might allow steam to enter. This steam comes from food while it is cooking, and it can destroy your solar box cooker quite quickly if it gets inside the structure.
4. Make a reflecting lid out of some relatively inflexible material and cover it, too, with aluminium foil. Connect the lid to the outer box with hinges and make some sort of adjustment for different lid heights.
5. Use a black metal base tray at the bottom of the inner box. Galvanised iron sheet is a very good choice, as it does not rust easily. A thickness of 1-2 mm is optimum for stiffness and operating efficiency. You can paint the base tray (and the outside of your pots) black with heat-resistant (spray) paint.
6. Use a glass or a plastic window at the top of the boxes to prevent hot air from escaping while cooking. You should seal the glass well, otherwise air will leak from the spaces between the boxes and the glass. A foam plastic strip or a silicon strip provides a suitable seal.
7. Use black pots with an even, flat bottom. Heat from the solar box cooker moves to your pot mostly by conduction from the base tray to the bottom of the pot. If possible, use tight lids with the pots to prevent steam entering the solar box cooker from the food. Steam stays inside the glass and slows cooking down.
You can look at the other models included in this book and think about why things are made the way they are. These instructions are still being developed. Test them in your own conditions, and feel free to improve them if you can. Please let us know if you find some way to make them better!
For families of up to 10 people
Lifetime 5 - 10 years
Manufacture: Suitable for small scale industry. Also do-it- yourself with guidance from someone who is familiar with the model or has appropriate skills.
Qualities: Good for overall use under 150 C
Measures: 550 x 650 x 320 mm. Volume 53 l
Weight 10 kg
Materials cost about 30 US-dollars
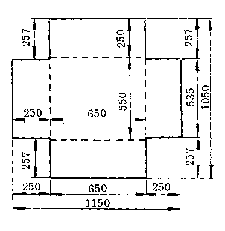
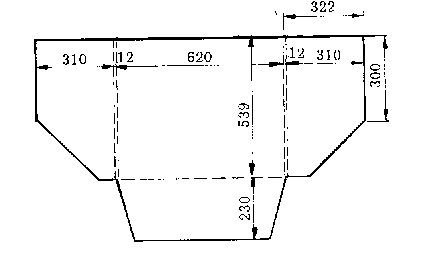
Measure, draw and cut as shown in the next picture from a strong 7-8 mm cardboard. You can use smaller pieces of cardboard; use tape for the joints.
Use a blunt instrument and straight wooden bar for bending folds in the cardboard. Tape the corners together with strong tape on both sides. Check that the outside measurements are exactly 550 x 660 mm!
Stick aluminium foil on the inside surfaces of the outer box with glue. You can also use smaller pieces of foil.
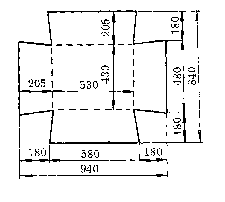
Do the same with the outer box, only this time stick the aluminium foil on the outside of the box.
First make the frames from 25 x 25 mm wooden pattens. Make the groove for the glass and the padding strip with a circular saw. Assemble with nails or screws for outside measurements:
Outer box 535 x 635 mm
Glass frame 550 x 650 mm
The lid 550 x 650 mm
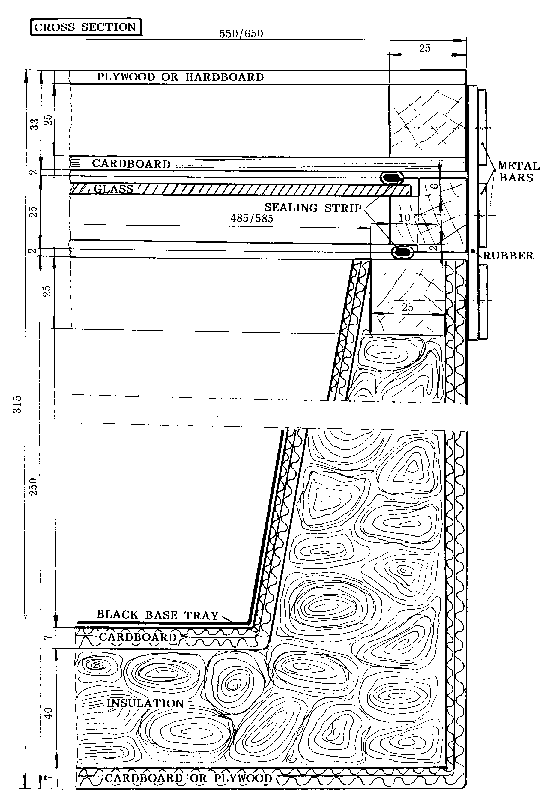
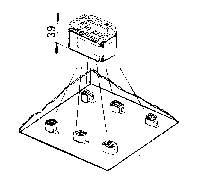 Cut against the waves 6 pc. of 500 mm long and 39 mm wide slices from corrugated cardboard for supporting parts. Roll and tape them about 100 mm from the sides. Glue them at regular intervals (see picture) inside the inner box, and insulate the space between the rolls with smooth rolls of newspaper, dry straw, rice hulls, etc. Use only a small amount of glue.
Put glue on the cardboard rolls and on the bottom of the inner box. Place the inner box exactly in the middle of the outer box so that the upper slits are 25 mm wide. Put some weights in the bottom and be sure that the surface underneath is level. Then insulate the sides in the same way as you did the bottom.
Before gluing the wooden frame to the top of the box check carefully to see that all frame corners are the same height from the level bottom. Then finish the edges and tape the side corners with strong tape.
Glue the foil in the inner box. Use strong waterproof foil if available, and make sure that there are no holes where water could penetrate the foil!
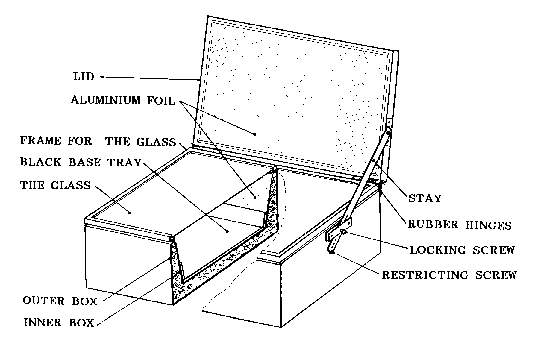
Fasten the 4 mm glass with small nails (without heads) in the wooden frame and glue the sealing strip with silicon glue. Look at the cross section in the illustration.
Make the covering surface from hardboard or plywood, the other side from cardboard. Make 6 pc. rolls as for the bottom from 24 mm wide slices, about 500 mm long. Tape and fasten them to the hardboard.
Glue the lid-battens, hardboard and cardboard together. Press them well together between two straight surfaces.
Stick the aluminium foil on the cardboard side and use tape to cover the edges of the lid. Stick the padding strip on the cardboard side of the lid about 30 mm from the edges.
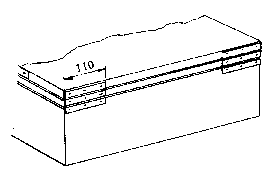
Put the glass frame and the lid precisely in their places and tape occasionally. Drill and screw the bars over the rubber plates (rubber hinges). Do this first to the lid, then to the glass frame and last of all to the box.
The base tray is necessary for the function of the cooker and makes the cooking space durable. Any metallic material is possible, but the surface must absolutely be painted black! Under the tray you can leave so mm:s space for insulation or put, for example, some sand for better pre- and afterheating performance.
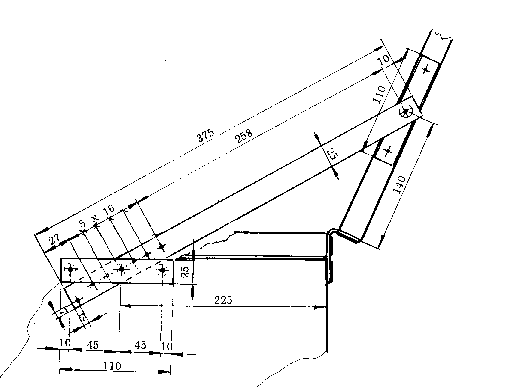
Cut the 2-3 x 25 mm aluminium or steel bars and drill 5 mm holes as shown in the picture. Install the hingescrew for the stay on 110 mm:s bar and screw it on the side of the lid. Then fasten the staybar with the a nut. Secure it with some glue. Install the restricting screw at the downcorner of the stay.
Install the bars at side of the box with 3 washers between the bars; first the front end, then put in the stay, and then the other end.
Drill a space for the locking bolt and fasten it with rope to prevent it from disappearing.
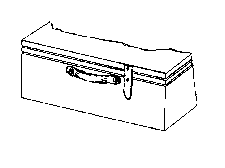
Install a handle for carrying the box and make a locking rubber for keeping it closed during transportation. Paint the box well against moisture and insects. A good way to prevent insects from eating the box is to install an extra (strong) aluminium foil outside the bottom of the solar box cooker!
Decoration is up to you!
Material Amount Price about US$
1. Cardboard, used m2 2,5 -
You can also use plywood instead of cardboard!
2. Aluminium foil m2 2,8 5
3. Glue, water based whiteglue l. 1 5
4. Glass, 4 x 515 x 615, used pc. 1 5
5. Paper for insulation -
6. Padding tape 5 x 10 mm.,
OT-SILICON No 1016 (Finnish) m 4,5 1
7. Silicon glue, a little 0,2
8. Wooden battens for lid, boxes and glassframe
25 x 25 x 550 mm pc. 6 2
25 x 25 x 650 mm pc. 6 2
9. Base tray 1-2 x 420 x 520 x 100 mm pc. 1 3
10. Hardboard or plywood for the lid
3-4 x 550 x 650 mm pc. 1 1
11. Bar for stay 2-3 x 25 x 375 mm pc. 1 1
12. Other bars 2-3 x 25 x 110 mm pc. 9 2
13. Rubber for hinges 3 x 87 x 110 mm pc. 2 0,2
14. Screw M 4 x 15 mm pc. 1 0,2
15. Locking screw M 4 x 30-50 mm pc. 1 0,2
16. Washers M 4 pc. 10 0,2
17. Screws 3,5 x 35 mm pc. 25 1
18. Tape, paper a little 0,2
19. Tape, strong (for air conditioning) a little 0,5
20. Ribbon, for carrying the box pc. 1 0,2
21. Paint for outside use l. 0,2 2
Totally 31
11. Tools
1. Pencil or crayon
2. Scissors
3. Sharp (carpet) knife
4. Metric measure
5. Ruler
6. Screwdriver
7. Drill + drill bits 2 and 5 mm.
8. Brush or spatula (home-made from cardboard) for spreading the glue
Manufacture: Needs craftmanship and guidance at the beginning
Final composition is quite simple
Qualities: Cheap to transport parts separately at a small package
Weight only about 2 kg. Materials cost about 20 US-dollars
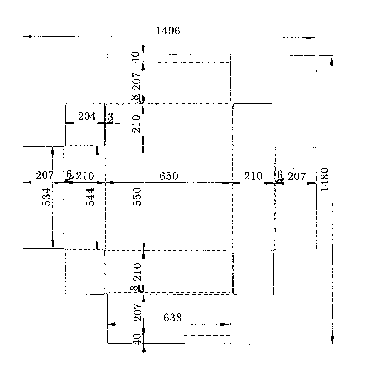
If you construct more than one cooker it is advisable to make templates using e.g. fibreboard or plywood.
You can order the cardboards by measures from factory, if series are big enough
These drawings are for 3 mm thick cardboard.
Mark the bending points to the models with small holes (for example)
Make the bending folds with a blunt instrument and bend the cardboard
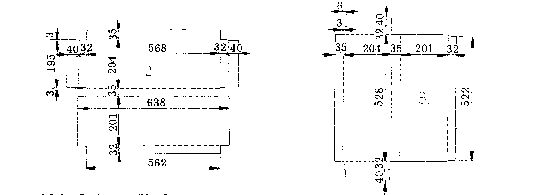
Make 2 pieces of both.
Insulate side parts with newspaper, wood chips, dry grass or dry moss (for example).
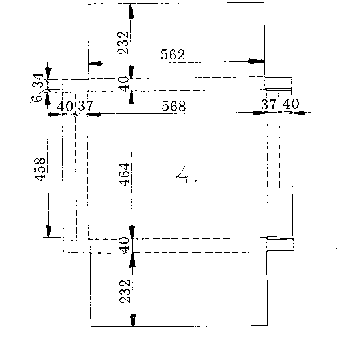
Insulate the bottom the same way as you did the sides.
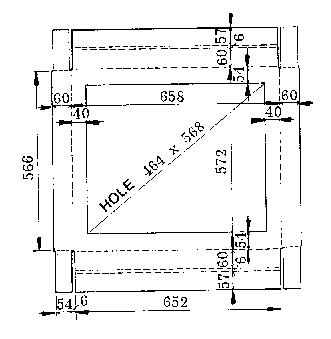
Glue bright 1 mm thick plastic (polyester) films to the both sides of the lid.
Glue wooden battens 6 x 15 x 200 mm to the edges.
Glue aluminium foil to the inner side. Glue 6 x 15 mm battens to the upper edge of the outer side. Put small pieces of wood to the outer side of the reflector for supporting rod.
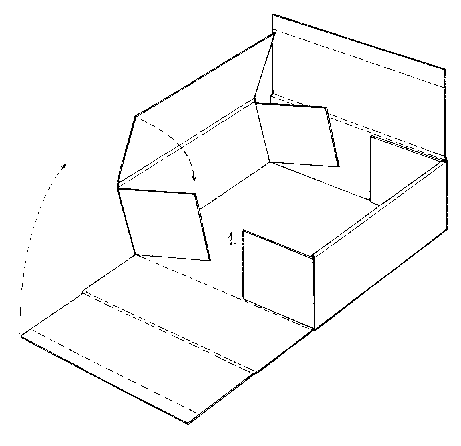 Fold the basic box as shown in the picture, add folded side insulator boxes and the bottom insulator box. Glue or tape is not needed here because the pieces support each other. Paint the inside of the cooker with a black heat-resistant paint. The paint is not obligatory but it raises the inside temperature by a few degrees and increases the lifetime of the cooker by protecting the cardboard from steam.
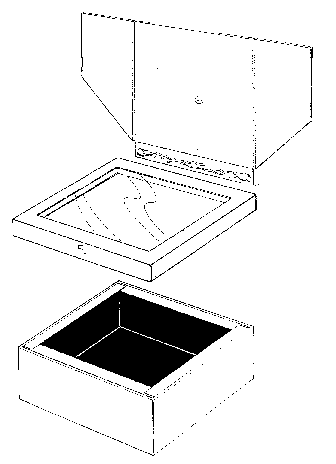 Glue the reflector from its lower side to the back edge of the lid. Stick the support on.
Add a black metal plate at the bottom (566 x 462 x 1-2 mm).
It is advisable to paint the box from outside (with a dark colour) to protect the box against humidity
Also for relatively big families
Manufacture: Suitable for do-it yourself construction
Needs a little bit of craftmanship
Qualities: Operates very well in equatorial regions
Measures: 600 x 1000 mm. Volume 150 l
Materials cost about 20 US-dollars
Needs a protecting plate for rains
(Drum cooker - 1 is fixed)
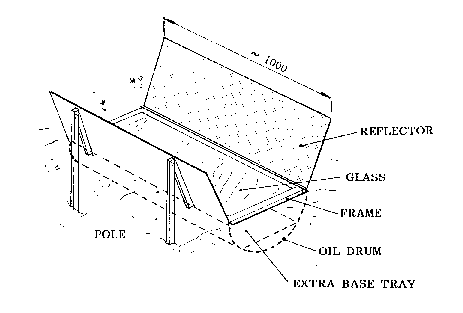
Place the cooker in an open field, so that trees does not obscure the sun’s rays. IMPORTANT: Place the long sides in an East-West direction.
Make it, it's easy:
Split an oil drum so that you get material for two cookers. (If you do not have the oil drum, you can use plywood or iron sheets for the sides of the box!). Hit a hole in the bottom of the drum as a rain outlet and paint the inside of the drum black. Make a place in the soil for the drum, and leave a space of about 15-20 cm for insulation.
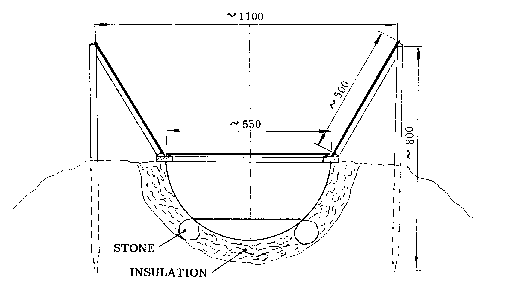
Put four stones, about 15 cm in diameter, on the ground as support for half of the oil drum. Then insulate the sides with dry hay or grass. Make a roof for insulation, cover it from the rain with hardwood boards or corrugated iron sheets. Make a frame of wood and nail it to the half-drum. Use plywood, hardboard or iron sheets for the side reflectors.
Install the reflectors so that there is about a 30-degree angle between the sun's rays and the reflecting surface. The recommended mirror size, in two pieces, is about 1 x 0.5 meter. The material can be aluminium foil, bright aluminium or used mirror pieces. Do not forget to keep the surfaces clean!
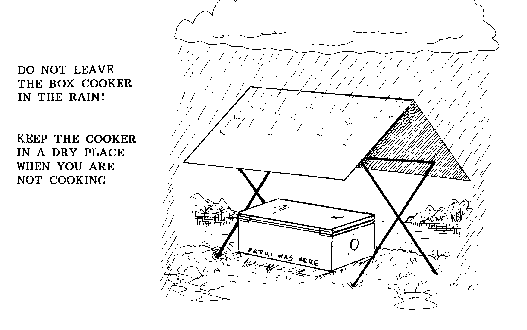
Make the glass lid of thick glass with finished edges. If not available, use ordinary window panes; but make a frame for them. Ensure that the lid fits tightly on the cooker. Do not leave gaps between the frame and the lid; make a seal if necessary. NOTE! Leaving your cooking pot inside the cooker for the night may not be wise because of “wadudu”; ants and insects. When the sun is shining, there will certainly be no such problem, because the heat kills everything inside the cooker. It is advisable to have a flat protecting plate over the cooker at nights and rainy weather.
This book gives some hints about how to use solar box cookers and also how to build them. Using solar (box) cookers is relatively easy, and usually people learn it very fast. There are some restrictions, relating to the time and the amount of sunshine needed, which should be kept in mind. Building is totally different matter. It is difficult to make a satisfactory solar box cooker with a very little money. There are some parts you cannot do without, like glass. Many of the people who are most in need of fuel-free cooking cannot afford even the simplest and cheapest solar cooker. Therefore financial aid, loans and NGO support can be very helpful. In India the government financially supports solar cookers with some percentage of the basic cost.
One good way to introduce solar cookers to a community is to have a common meeting with the whole community. This can be done, for example, by means of the so-called “Participatory Rural Development”-method (PRA-method). PRA begins with the assumption, that both outsiders and locals have valuable information to contribute. The reason for a few days’ common meeting is to exchange this information for mutual benefit. It is very important to have discussions with different people and to let them all bring their views to the session. Old women, children and youngsters can have as valuable ideas as those who usually monopolise the decision-taking. There are a lot of different ways in which to collect and analyse this information within PRA. The red line goes this way: local people, everywhere in the world, are very well able to analyse their own situation. The outsiders' role is to bring their knowledge to the places, where it can be useful. For example, you can compare different ways of cooking by asking people to make a list of all the cooking devices they use. Ask them what are the different reasons why they use these cooking methods. The reasons for some of them could be something like: ”Easy to use," or, “cheap to build," or, “cooks fast and conveniently," or, “it is safe." Then ask them to give points from one to five to each cooking method, considering each reason. People can compare different methods and at the same time consider what are the things they value in their cooking.
A change from cooking by fire to cooking with sunshine can be difficult for people. It is good to progress slowly. Locate some interested people to begin with, and stay with them for long enough. People need a little bit of encouragement at the beginning. If a few people from the same neighbourhood all have solar cookers, they can share their experiences as well as have solar cooking parties.
Just giving solar cookers away does not usually lead anywhere, people should pay for them at least with their work, if they do not have money. You can organise courses for poor people, where they can build their own solar cooker at the price of the materials.
Practise what you preach. Use the solar cooker yourself as much as you can, you will be surprised how many people will become interested. Respect the local eating habits and dishes and modify the cooker to suit them. Be honest with people’s questions, explain to them how solar cookers work and also how they do not work. A lot of people are willing to try new things, if they know how to try. You can promote a newspaper or local radio campaign for the promotion of public awareness of solar cookers.
If people get permanently interested in solar cooking and want to buy and use the cookers, it might be wise to begin to manufacture them locally. For this you need a suitable place and the right tools. In this book, the TFL-model in particular is meant to be manufactured locally on a small scale. TFL has tried it in Namibia with a fairly good success. Even people without any technical background can learn how to build these cookers with a competent teacher. If you do not have anybody with previous experience of building, you can, for example, try to get local artisans to help you. Usually people learn with a little practice, although some of the first cookers might not be the most brilliant.
You can organise building courses for rural (or urban) people, or have a small workshop with permanent workers. You can ask existing organisations to adopt solar cookers as a part of their program. One effective way to promote building is to teach technical teachers and home economists from schools.
An effective way to promote solar cooking is to carefully teach some local, very motivated people to promote their use.
Konttinen, Petri: Solar Cookers for use in Namibia, M.Sc.-thesis, Helsinki University of Technology, Espoo, Finland (September 1995)
Kuhnke, Klaus et al.: Solar Cookers in the Third World, Vieweg & Sohn, Braunschweig/Wiesbagen, Germany 1990.
Pejack, Edwin (ed.): Advances in Solar Cooking, Proceedings of the First World Conference on Solar Cooking, University of the Pasific, Stockton, California, USA 1992.
European Committee for Solar Cooking Research (ECSCR), Office of the Co-ordinator, C/O Synopsis, Route d’Olenet, F-34 700 Lodève, France
Petri Konttinen, No permanent address at the moment; in Namibia 1.10.1995 - 31.1.1996, Parents address: Jokilahdentie, FIN 58300 Savonranta, Finland, E-mail: Petri.Konttinen@hut.fi
Ari Lampinen, Kauppakatu 12 A 1, FIN-40100 Jyväskylä, Finland, Tel. +358-41-617 582 (home), E-mail: ala@jyu.fi
Riitta Wahlström, Esankatu 7, FIN-40700 Jyväskylä, Finland, Tel. +358-41-603 741 (work), 214 383 (home), E-mail: Riitta@jyu.fi
Place of printing: Painosampo, Helsinki, Finland
Paper: Nature friendly Jamsa Matt- paper